
College of Pharmacy IT
UITS - University Information Technology Services
UITS is now the main contact for all your IT needs, 24/7. They can be reach for support via phone, chat, online, or in-person.
Hours: Monday–Friday, 7:30 a.m.–5 p.m.
Submit a ticket: Get IT Support (service.arizona.edu) and Select Get Support
Or send an email to helpdesk@pharmacy.arizona.edu which ingests into our ticketing system and these tickets are routing to our teams
Phone: Call 520-626-8002
Walk-up support is currently available in Health Sciences Library(AHSL) Building 201A, Room 2101H
Hours: Monday–Friday, 7:30 a.m.–5 p.m.
College of Pharmacy IT Information for Students
The University of Arizona currently contracts with Sophos to provide Antivirus software for University owned equipment. Sophos provides a free version for Students, Faculty and Staff for their use on personal devices. Sophos professional version is available for an annual fee.
If your computer is a personal computer (non-UofA owned) and is running Windows, we strongly recommend you use an up-to-date antivirus program.
College of Pharmacy IT Information for Staff & Faculty
Box Drive is a desktop application that lets you access all your files stored in Box directly from your computer's file explorer (like Finder on a Mac or File Explorer on Windows), without using up much hard drive space.
Where to Download -
- Go to the official Box downloads page: https://www.box.com/resources/downloads
- Select the right version for your computer:
- Click on "Download Box Drive for Windows (64 bit)" if you have a Windows PC.
- Click on "Download Box Drive for Mac" if you are using a Mac.
- Save the installer file to a location you can easily find, like your Desktop or Downloads folder.
Important Prerequisite: If you have an older application called Box Sync installed, you must uninstall it before installing Box Drive. The Box Drive installer will typically handle this for you, but it's best to be aware of it.
Install Box Drive Using Admin by Request -
Admin by Request is a tool that allows you to request temporary administrator permissions to install approved software. The most common method is to run the installer with elevated rights, which Admin by Request will intercept and manage.
Here are the step-by-step instructions
On a Windows PC:
- Locate the Installer: Go to where you saved the Box Drive installer file (e.g., Box-x64.msi).
- Initiate "Run as administrator": Right-click on the installer file. From the context menu, select Run as administrator.
- Admin by Request Prompt: Instead of a standard Windows prompt, an Admin by Request window will appear.
- Submit Your Request:
- The window will likely ask for a reason for the request. Type in a clear justification, such as "Installing Box Drive for file access."
- Your email or other details may be pre-filled.
- Click OK or Submit.
- Approval (If Required):
- Auto-Approved: In many organizations, requests for known applications like Box Drive are automatically approved. You will see a notification that the request was approved, and the installation will begin.
- Manual Approval: If your IT department needs to approve the request, you will see a message that your request has been sent for approval. You will receive an email or a desktop notification once it's approved. After approval, you may need to right-click and "Run as administrator" again.
- Complete the Installation:
- Once approved, the Box Drive installer will launch. Follow the on-screen instructions to complete the installation.
- When the installation is finished, the Box Drive login window will appear.
On a Mac:
- Locate the Installer: Go to your Downloads folder and find the Box Drive installer file (e.g., Box.pkg).
- Run the Installer: Double-click the Box.pkg file to start the installation.
- Complete the Installation:
- Follow the prompts, clicking "Continue" and "Install."
- If prompted, select "Install for all users of this computer."
- You will see a confirmation when the installation is complete.
First-Time Login and Setup -
After the installation is complete, you need to log in to your Box account.
- Launch Box Drive: The application should launch automatically. If not, find it in your Start Menu (Windows) or Applications folder (Mac) and open it.
- Log In: At the login screen, enter your UA email address and click Log In. You will likely be redirected to WebAuth single sign-on (SSO) page to complete authentication.
- Take the Tour (Optional): Box Drive will offer a quick tour of its features. This is helpful for new users.
- Access Your Files: Once you are logged in, a new Box folder will appear in your File Explorer (under "This PC" or "Quick access") or in Finder (under "Locations"). You can now access all your cloud files as if they were on your computer.
The University of Arizona currently contracts with Sophos to provide Antivirus software for University owned equipment. Sophos provides a free version for Students, Faculty and Staff for their use on personal devices. Sophos professional version is available for an annual fee.
If your computer is a personal computer (non-UofA owned) and is running Windows, we strongly recommend you use an up-to-date antivirus program.
Step 1: Set Up NetID+
First, setup Multi-Factor Authentication (MFA, NetID+) by configuring your NetID to utilize NetID+.
Step 2: Download Installer
To download the current version of the client go to https://vpn.arizona.edu
you will be prompted to log in: select 1-UASSLClient for the connection enter your UANetID, password and NetID+ methos, like push, sms, or one of the previously texted authorization codes. (we recommend using the Duo push method, as that is extremely convenient Follow the directions here, selecting 'Smartphone' as the method.)
Once logged in you will be taken directly to the page to download the correct version for your device. (both Windows 10 and 11, and MacOS versions from Big Sur to Sonoma are supported.)
For other devices
iPhone or iPad: the client is available on Apples App Store
Android phones and tablets: the client is available on Google Play
Chromebooks: The Chrome Web store
Step 3: Configure Client
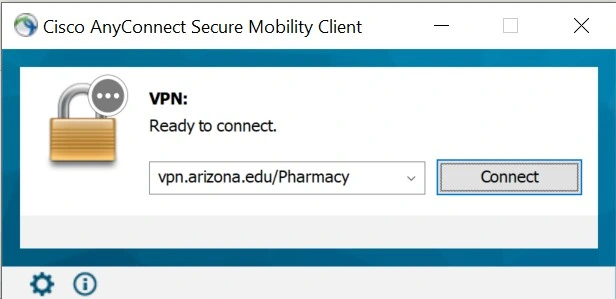
After installed, open the AnyConnect Mobility Client.
-If you are using a Mac you can find the Cisco VPN in "Applications".
-If you are using a Windows machine you can find it by:
- Clicking “Start”
- Type “Cisco AnyConnect Secure Mobility Client” and select it when it pops up
- In the Cisco AnyConnect Secure Mobility Client window, type in the VPN connection for College of Pharmacy as: vpn.arizona.edu/Pharmacy (it is case sensitive).
Step 4: Connecting to the VPN
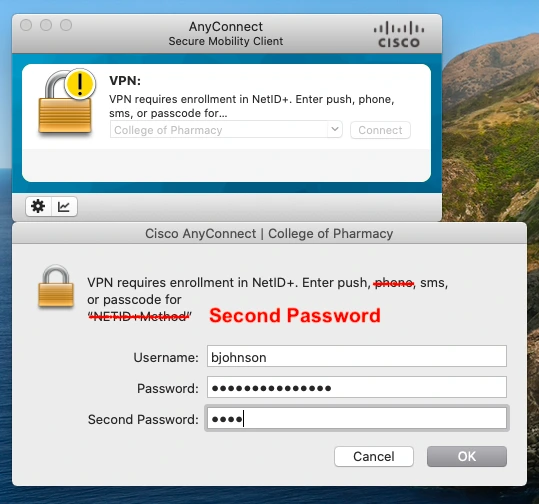
- Enter:
- NetID
- NetID Password
- Second Password (The dialog offers 'phone' as an option, the UA no longer supports that)
- For Duo Mobile enter “push”; click OK. Open the Duo Mobile app on your smartphone or tablet. You will receive the push from The University of Arizona. Tap on Approve.
- For codes via text message, enter any of the codes that have been sent to you; click OK. If you need to get more codes, enter 'sms'
- For Yubikey, place cursor in third field and tap your Yubikey; click OK.
- Click “Accept” to accept the Cisco AnyConnect caution (On Macs you may be prompted to allow access to your keychain for a certificate, click on Deny; this is a bug of some sort with the UA’s configuration)
- Now, you should be connected to the College of Pharmacy network via the University’s Cisco AnyConnect Secure Mobility Client.
Step 5: Optional Setting
If you need to access a local networked resource like a home printer or your home network while connected to the Cisco AnyConnect Mobility Client VPN, before connecting to the VPN you must:
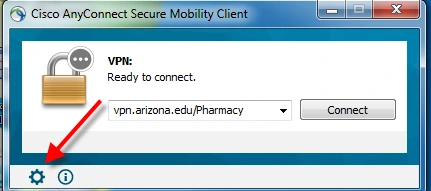
- Open the Cisco AnyConnect Mobility Client
- Click the gear icon in the lower left corner
- Check the box “Allow local (LAN) access when using VPN (if configured)”

Zoom is the leader in modern enterprise video communications, with an easy, reliable cloud platform for video and audio conferencing, collaboration, chat, and webinars across mobile devices, desktops, telephones, and room systems that can create an opportunity for active learning with real time conversations. Many of the teaching practices that you utilize in a face to face physical classroom setting can be tweaked and used in a Zoom meeting.
The University of Arizona College of Pharmacy IT Group has set up a number of conference rooms that are now Zoom Rooms. Zoom Rooms is a software-based room system that provides an integrated experience for audio conferencing, wireless screen sharing and video conferencing. Zoom Rooms can be used for room only attendees or remote attendees joining from another room, from their desktop, or from their mobile device.
All our zoom rooms support meeting invites by sending the calendar invite to the email addresses listed below; or the meeting ID can be manually entered on the Device screen
Here is a list of our Zoom Rooms:
Zoom Tips & Shortcuts -
Mute/Unmute Audio:
- FOR MAC: ⌘Cmd+Shift+A
- FOR PC: Alt +A
Meeting Host can mute everyone:
- FOR MAC: ⌘Cmd+Ctrl+M
- FOR PC: Alt+M
Turn Off Video:
- FOR MAC: ⌘Cmd+Shift+V
- FOR PC: Alt+V
Share Screen:
- FOR MAC:
- To start a screen share, type ⌘Cmd+Shift+S
- To pause/resume a screen share, type ⌘Cmd+Shift+T
- FOR PC:
- To start a screen share, type Alt+Shift+S
- To pause/resume a screen share, type Alt+T
Record Meeting:
- FOR MAC:
- ⌘Cmd+Shift+R to start recording any meeting
- ⌘Cmd+Shift+P to pause/resume recording
- FOR PC:
- Alt+R to start recording any meeting
- Alt+P to pause/resume recording
Zoom Security -
The security of your professional and personal calls is important to the University of Arizona College of Pharmacy.
The meeting host has a variety of controls they can use to secure their meeting. For example:
- Lock the Meeting: When you’re in the meeting, click Participants at the bottom of your Zoom window. In the participants’ pop-up box, you will see a button that says Lock Meeting. When you lock the meeting, no new participants can join, even if they have the meeting ID and password.
- Expel a Participant: In the participants’ menu, you can mouse over a participant’s name, and several options will appear, including Remove. Click that to kick a participant out of the meeting. They can’t get back in if you then click Lock Meeting.
- Waiting Room: Protect participant privacy by keeping some participants in your virtual waiting room while you finish up meeting with others.
- Attendee On-Hold: If you need a private moment, you can put attendees on-hold. The attendee’s video and audio connections will be disabled momentarily. Click on the attendee’s video thumbnail and select Start Attendee On-Hold to activate this feature.
Other host controls include locking screen-sharing, enabling/disabling participant recording, watermarking screen shots, and disabling in-meeting chat.
To ensure that all calls are secure please take the additional steps to stop unwanted screen sharing and inappropriate content from being presented in your meetings.
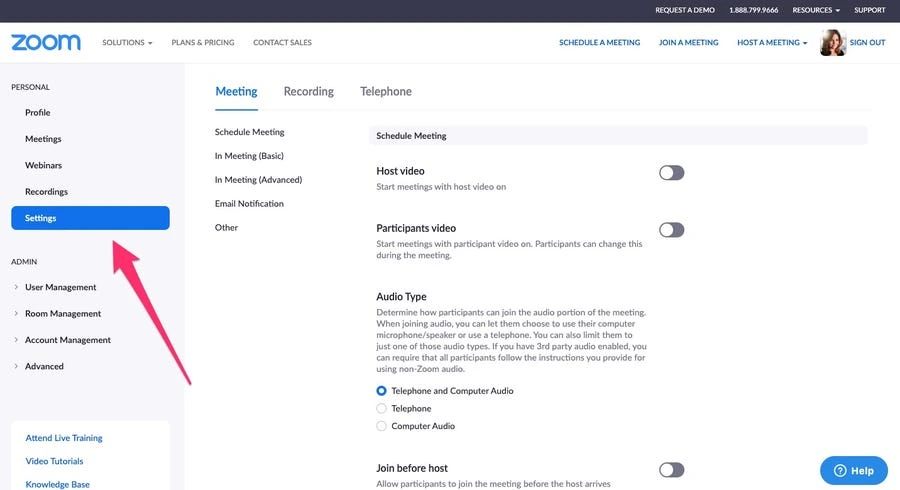
- Open Zoom on your Computer and Click on the Settings menu on the left-hand side.
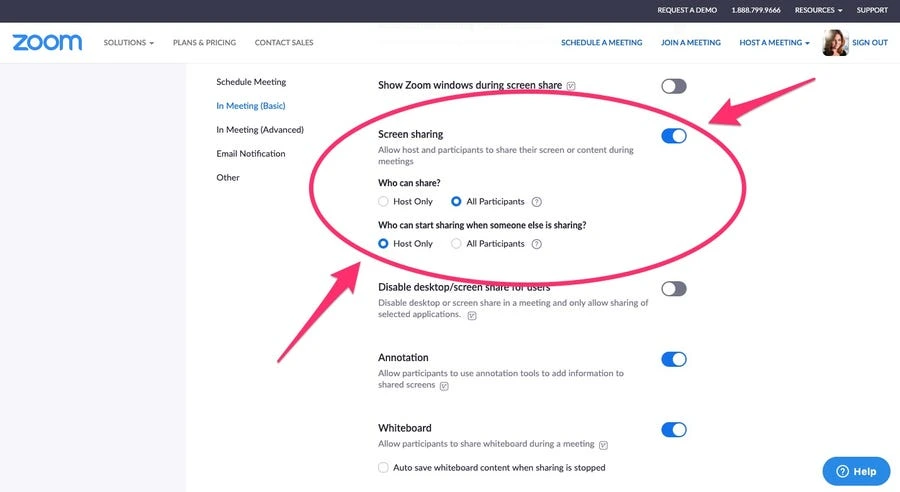
- On the Settings page, scroll down until you get to the "Screen Sharing" section. The Screen sharing setting will automatically be toggled to "on" — Turn this feature off. (This is best to do before a call).
.
Zoom Offers an Add-in for Outlook -
It works with all supported Outlook applications: Windows, Mac, Web, IOS/iPadOS and Android.
The Zoom for Outlook add-in allows you to schedule Zoom meetings directly in a new calendar invitation in Outlook on all platforms: Windows, Mac, Web, IOS/IPadOS, and Android. This is not the old Zoom plugin for outlook which only worked on Outlook for Windows.
It is simplest to install on the Web version of Outlook.
- Go to Office365 or directly to Outlook on the web, and log in with your UA NetID email and password.
- Go to the Calendar in Outlook and click on New Event.
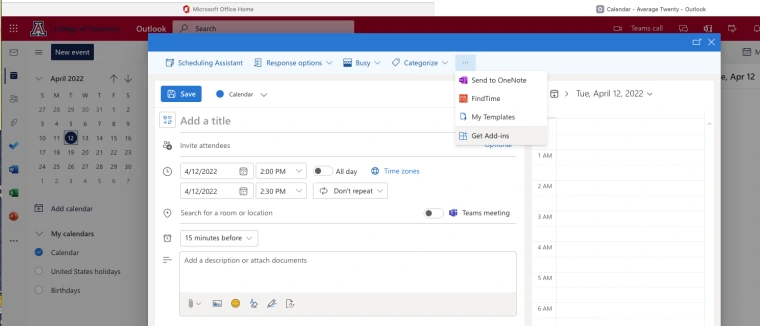
- Click on the three dots at the end of the menu in the pop-up and click on Get Addins.
- In the Add ins for Outlook screen enter 'zoom' in the search box then select Zoom for Outlook when it appears
- Click on Add in the Zoom for Outlook window that pops up. It will add it then put up a small informational screen.
- Now the Zoom icon will appear your Outlook app on various devices. You may need to restart, log out and log back in or update Outlook for it to show up everywhere.
Image
Using Zoom for Outlook Add-In -
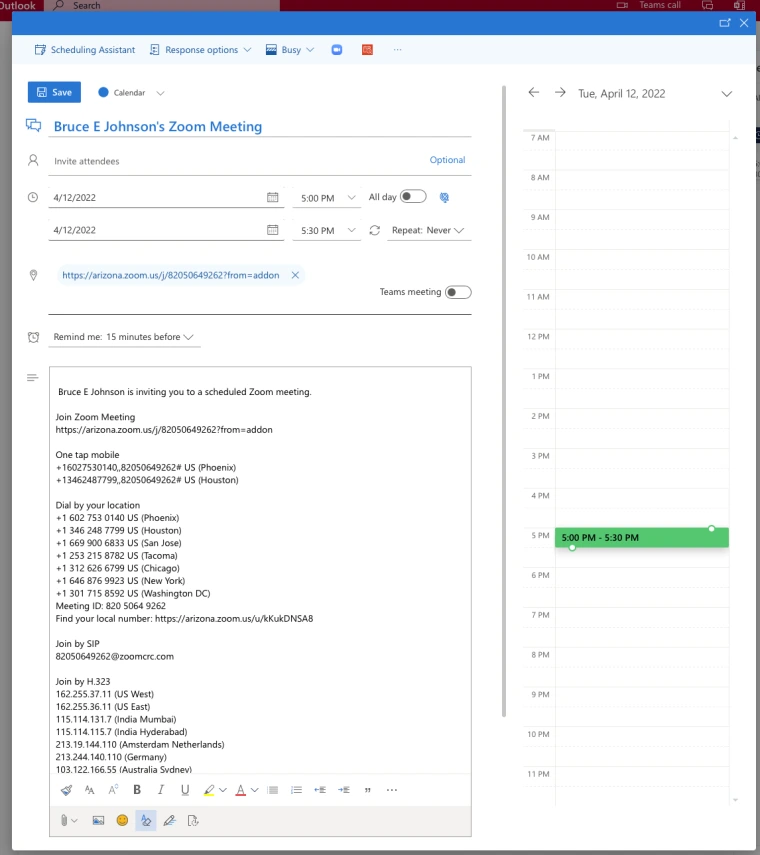
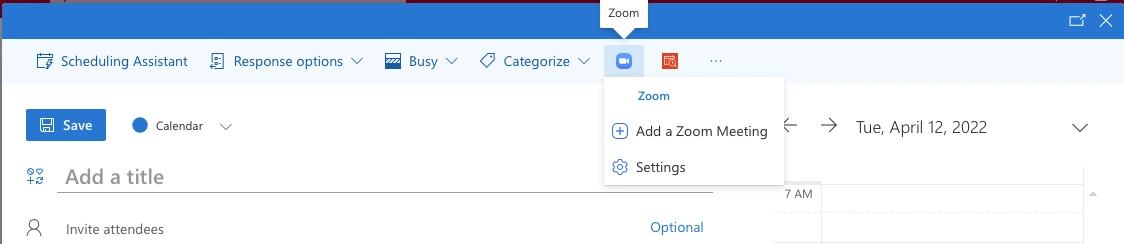
When creating a new invitation click on the Zoom icon in the New Event and select Add a Zoom meeting
If you are not signed into zoom you will be prompted to sign into Zoom. In the web version it will open an new window, in the application a window in the app will open. Both will ask you to sign into zoom. Be sure to click on the 'SSO' link and enter 'arizona' in the SSO sign-in window.
Image
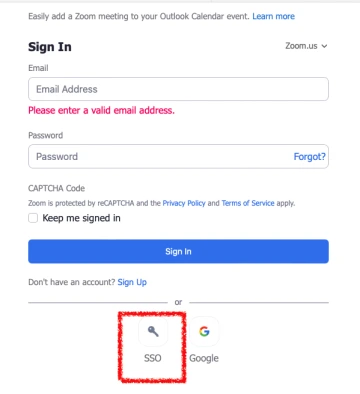
Sign in with your UA NetID as usual through Webauth; once signed in you will be presented with a calendar invitation with Zoom meeting info attached.